2.x HUD Conversion Guide
There's quite a few Wyrmlings and Hatchlings out there with the old egg style HUD. The time I used it it always annoyed me a bit as I'd try to cam or select something high up and I'd hit a hidden HUD button. It also was much harder to fine-tune colors than with the newer HUD.
What's that you say? You agree and want to manually convert your wyrmling or hatchie over? Well then, this is the thread for you! And take heart, it's pretty simple, just time-consuming.
Also, one caveat: You need to own at least one dragon that supports the 2.x HUD out of the egg for this conversion. That means anything Spirit or newer, but whether it's Hatchling or Wyrmling size doesn't matter.
Backup
The most important step before doing -any- work on anything that has copy permissions: BACK UP THE ORIGINAL. Then, if you do somehow make it FUBAR you can grab another copy and start again.
Now, if you do forget you can grab another out of the egg, so it's not -as- important, but it's something to always remember. What I usually do is make a "temp" or "work" folder and copy all the parts I'm going to work on to that folder until I'm done.
Preparation
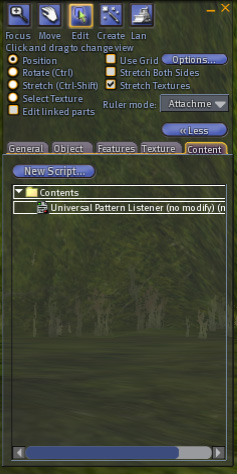
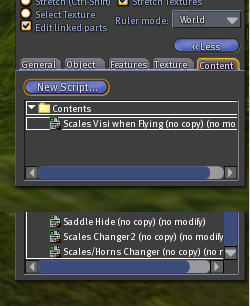
Drag a piece of the 2.x-compliant dragon in-world. Don't right-click and drop, just drag from inventory so it rezzes a copy. Now edit it and switch to contents. You should see something like this:
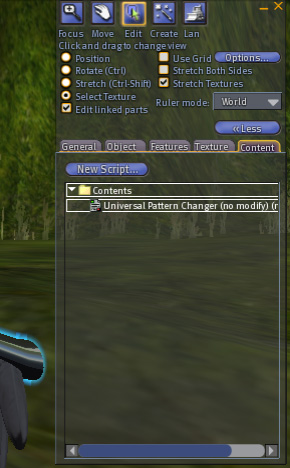
Drag a copy of the Listener script to your inventory where you can find it... preferably in the same work directory you put the parts in if you did what I do. Now check "edit linked parts and select a single prim other than the primary. Usually the root prim is a tiny ball so that shouldn't be too difficult. You should now see this:
Copy this Changer script to the same location in your inventory as the Listener. Both scripts are needed for the system to work.
Now we're ready to get down and dirty!
Conversion
Drag the first piece you want to work on out Start with a leg, since it doesn't have any hidden parts.
Right-click and edit it, and flip to contents. Delete anything you find inside, then drag the Universal Pattern Listener into it. This sets up the "backbone" of 2.x support. Now comes the tedious part.
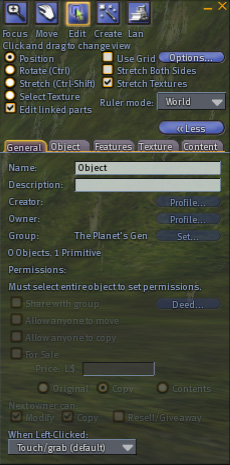
Select Edit Linked Prims, and select a single prim. Switch to whichever prim you want to start with, and select the General tab. You should see the below:
The name field may vary. Now I need to explain a little about how the scripts work.
When you select a body part to change, how do the scripts know which parts change? The Name and Description fields hold the key. The Name field tells the script what body part type that prim is, and the Description field describes any special responses it needs to perform at other times. You can ignore the Description field for now, as that will be covered under the Special Cases section below.
The conversion can be summed up in three sub-steps:
1) Change the Name field for the prim to the relevant body part type. For example, for a part changed by selecting "scales" on the HUD, name it "scale". There will be a list further down of the names I know. Anyone can feel free to add onto it, as this same conversion process will also allow you to configure prims you add in the process of modding to work with the 2.x HUD as well.
2) Change to "contents" for the prim. If all you see is a "Listener" or "Changer" script, plus possibly a bunch of textures, delete them all. If you see anything besides this, go down to Special Cases.
Don't be alarmed if the prim changes to the wood texture, that's normal if there was textures inside.
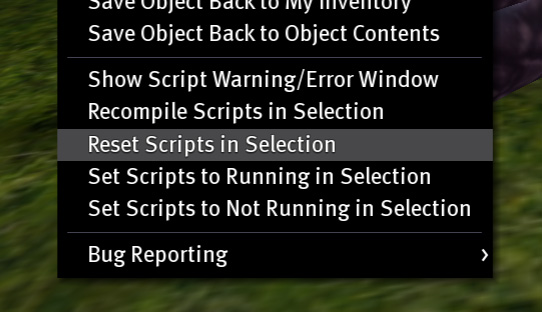
3) Now drop the "Universal Pattern Changer" script into the prim, and that prim is done. Note: If you forgot to rename before dropping in the changer script, then after renaming just go to Tools menu, and select "Reset Scripts in Selection" as below:
This makes the script "re-detect" the type of prim.
Now go through and repeat the above three steps for every prim but the root. That's what makes it tedious.
Special Cases
This was the case with my Astral Wyrmling's legs, and there's two different ways to go on this.
Option 1 - Simple Rename
Name the root prim a body part type(such as scale) as normal, and drop the changer in as well. The quick-and-dirty option, but make sure you remember what body piece is what in this case. Caveat: I haven't tried this myself, so no guarantee it will work.
Option 2 - Add a Prim
This is the longer, but more permanent solution(and the one I used).
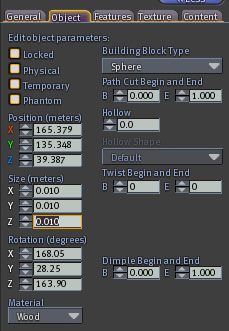
1) Wear the relevant body part, and edit it, then switch to the Object tab. Write down the 3 numbers under rotation, then look at the top of your screen. You should see three numbers that look something like this:
Write down these three numbers as well. This is the positioning information you'll need to refit the body piece.
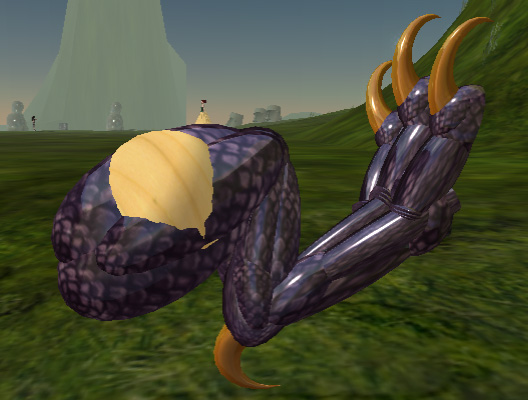
2) Make a sphere of default size, and place it near the partially-converted body part. Now in edit mode, using the object tab, copy the numbers from the rotation fields on the rezzed body part's root prim to the rotation fields on the sphere. (Tip: Set the sphere's Y rotation to 0 first. It defaults to 90, which can screw things up.) Once this is done, do the same with the position numbers. Make sure they match exactly. You should now have a wooden ball embedded in your thigh(or other body part)!
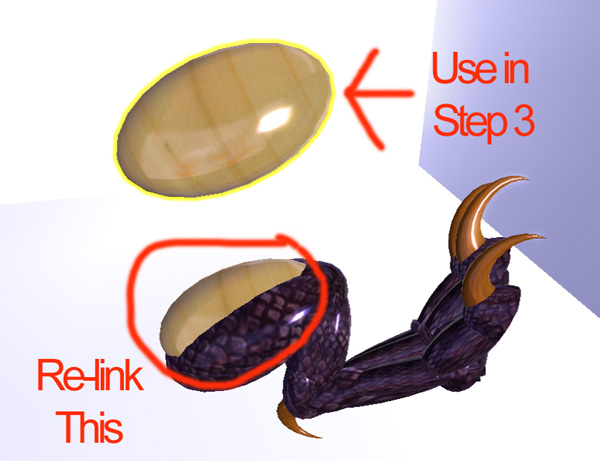
3) Now select the body piece with Edit Linked Parts unchecked. Hold down shift and click the part of the ball sticking out of the body piece. You should now have both selected. Now go to Tools menu and select Link.
The ball should now be the only prim in yellow. Rename it to the name of the body piece e.g. "[ Astral Wyrmling ] hind leg L" and drop the Listener script in. Now delete the Listener script(or whatever scripts are inside) out of the former root prim and convert that prim as normal with the Changer script.
4) Select Edit Linked parts, and select the sphere again. Go to the Object tab and change the size fields all to 0.010. Voila, no more ugly wood implant.
5) Now attach the redone body part to the same attachment spot it was on before. If you don't remember, just wear the backup copy and look at your inventory window. It should be listed next to the object name.
6) Now it looks twisted in some weird position right? Well, remember the numbers you wrote down back in step 1? Put the rotation numbers you wrote down back then in the attachment's rotation fields.
Now, notice how it won't let you enter position numbers directly for attachments? (LL should fix it so you can, but that's another story.) Make sure you're in position editing mode and slowly move the body piece until the numbers up top match the numbers you wrote down from up top before.
If all goes well, your leg is now in the exact same position it was before, and has a proper root prim.
One final note: Once you finish these positioning edits, detach and re-attach the body piece. If you don't do this and SL crashes, you'll lose the attachment positioning data and have to redo 2F all over again. Re-attaching will "save" the positioning.
Option 3 - Copy the Root Prim
(Suggested by Skye McArdle)
1) Select Edit Linked Parts, and select only the root prim. Delete all the old stuff from inside it, then unlink it from the body piece.
2) Uncheck Edit Linked Parts, then shift-drag a copy of that prim. Re-link the copy still in the proper position to the body and convert this prim as normal.
3) Re-select the copy of the prim floating seperately(and unlinked), then hit ctrl-Z, or select "Undo" from the Edit menu. Now go to the Object tab and change all size parameters to 0.5m or 1m, large enough to stick out of the body piece like the image at the end of step 2 in Option 2.
4) Select the body piece, then shift-select the remaining unlinked prim. Link the two from the Link command on the Tools menu. The only one in yellow should be the new oversized prim.
5) Now use Edit Linked parts to select just the new root prim. Drop the Listener script in, then change to the Object tab and change the size fields to 0.01m or whatever the minimum may be to hide it within the body piece.
That's it! The copy of the root prim has the same angle and positioning data as the original, and should "remember" all the attachment information so you should be able to just take it back into inventory and wear it.
Special Case - Prim contains "Invisible when/Visible when" or Saddle Hide script
If you happen to see either of the below in contents, this set of steps applies to you:
Remember how I mentioned the Description field would be used later? This is that time.
Invisible/Visible when flying
When you see these scripts, the addition is simple, though it depends on location.
1) On the tail - If the prim on the tail is visible when standing still, then enter "tail sit" in the description field. If visible in flight, then "tail fly" is what you need.
2) On the wing - See above, except use "sit" and "fly" respectively.
Note: If the prim is see-through in any way, like the whisker-spines on an Astral or the wing membranes on most dragons, include ",alpha" after the first phrase. For example, a wing membrane prim that is only visible in flight would have "fly,alpha" in the Description field.
Saddle Hide
This script is used to hide things like spines when wearing a saddle so you're not impaling your rider. Simply add "saddle on" to the description field for any prim that has this script, and add the ",alpha" like in 1B above for any see-through spines.
If you already dropped the script in before setting the description field, just do a Reset Scripts to fix it right up.
Special Case - Sounds and emitter script in prim
If you already have a Sound Emitter object from your script source dragon, feel free to delete these and wear that. If you don't, just make a small prim and copy the sounds and script into that, then wear. Problem solved.
Special Case - Franimation scripts and animations
If you find these scripts in any body part, you're likely working on a hatchie head. These are the AO, or what makes you the right size. Leave anything whose name starts with a *, any notecards, and any animations alone. Otherwise proceed as normal.
Special Case - Eyes
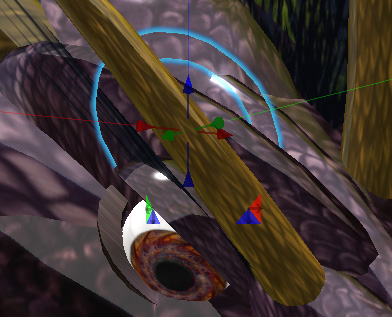
Eyes require a couple special steps to convert over. When you first select the eye area, you should get the "eyelid" ball. In addition to the normal contents for scales you should see a script with full perms called "Blink1" or something similar. Leave this script alone, as it handles the blinking, but clear the rest.
Now, to get to the eye itself. With only the eyelid ball selected, go to the Object tab. Now, change the Z position number to be .1 greater. For example, if Z was at 25.563, you'd change it to 25.663. Now you should have the blinking ball be a short ways up and the eye itself exposed. (You can go up .2 or higher as needed, just be sure to note how much it was.)
Now you can edit the eye socket and eye itself as normal. Once you're finished, find the eyelid prim again(if you're having trouble, wait for it to blink, or hit ctrl-alt-T to highlight all transparent objects) and change the Z position back to the previous value to drop it back into place.
Special Case - Breath Prims
Leave these alone. 'Nuff said.
Special Case - Body piece is No Copy when picked back up
If you see it go no-copy when you pick it back up after you're all finished, look through every prim again. This only happens if you missed an original script somewhere. A possible quick-and-dirty way to find the prim(though this only works if you missed a prim entirely) is to use the 2.x HUD and change textures, then see what prim(s) of that type isn't changing.
Final Notes
Body Part Codes
The body part codes for the most part are obvious, but there's a couple that aren't. The ones I know are as follows:
- Scales - scale
- Belly - belly
- Spines - spine
- Claws - claws
- Whiskers - quill
- Horns - horns
- Eyes - eyes-
- Wings - wings
- Nose(Spirit HUD) - nose-
- Nose(Egyptian HUD) - nose
- Armor - armor (not 100% sure on this one as I don't have an actual fae, but I recall this working)
- Tongue - tongue
- Teeth(Wyvern Edit HUD) - blade
- Ear Tuft - fur
- Cloth - cloth
- Trim - trim
- Gem - gem
- Gem 2 - gem2
- Feathers(Egyptian HUD) - wings
- Quill(Egyptian HUD) - blade
Other Notes
The body parts you've modded will show up as "No Mod" in inventory, but don't worry, you'll be able to mod them just fine while wearing or while rezzing them on the ground. You just have to rez them on the ground to rename them, then take them.
The HUD dispenser will give you a HUD for any type in your size class, so if you don't have access to a 2.x HUD of your type, just pick one that's as close as possible. This is why I detailed some of the codes above for dragons that never had a 1.0 HUD; you can use them to make the dragon fit the HUD.
2.x scripts and 4.0 scripts are similar, but the Listener code has changed slightly, so unless you want to go all the way to 4.0 don't use an adult Wyvern or Wyverling for a script source.
Fae scripts were made during a transitional phase to 2.x, so it also is not a recommended source for 2.x scripts. (Information thanks to Skye McArdle)
That's all I can think of at the moment. Happy modding to those who wish to try this, and remember to ALWAYS BACKUP FIRST.
